• Spare Parts Guide
    • Eclipse BCS Spare Parts Guide
    • Eclipse CS Spare Parts Guide
    • Eclipse BS Spare Parts Guide
    • Iwata Eclipse SBS Spare Parts
    • Neo for Iwata CN Gravity Feed Spare Parts Guide
    • Revolution AR Spare Parts Guide
    • Revolution BR Spare Parts Guide
    • Iwata Takumi Eclipse Side Feed Spare Parts
    • Neo Series for Iwata – TRN2
    • Neo Series for Iwata – TRN1 Spare Parts Guide
    • Iwata Kustom TH Airbrush Spare Parts Guide
    • Evolution 1998 – 2023 Spare Parts Guide
    • Evolution 2024 Spare Parts Guide
    • Ultra 2006-2023 Spare Parts Guide
    • Ultra 2024 Spare Parts Diagram
  • Product Help
    • Troubleshooting Airbrush Spray Guns
    • Which Compressor
    • Which Airbrush
    • Service and Repairs
    • Iwata Warranty
    • Testimonials
  • Blog
  • My Account
Graphic Air
Search
+44 (0) 1423 522 836 |CONTACT US
00 items
  • HOME
    • SHOPPING
      • My Account
      • Order Tracking
      • Cart
      • Checkout
    • INFORMATION
      • Terms & Conditions
      • Privacy And Cookies
      • Shipping
      • Returns
    • GET IN TOUCH

      Graphic Air
      Unit 1 Levens Hall Park,

      Lund Lane, Killinghall,
      Harrogate, HG3 2BG

      Phone:

      +44 (0) 1423 522 836

  • Special Offers
  • Airbrush
    • Iwata Airbrush
      • Iwata Revolution Airbrushes
      • Iwata Eclipse Airbrushes
      • Iwata High Performance Plus Airbrushes
      • Iwata Hi-Line Airbrushes
      • Iwata Custom Micron Airbrushes
      • Iwata Neo
      • Spray Guns for Industrial Use
    • Harder & Steenbeck
      • Colani
      • Infinity
      • Evolution
      • Hansa
      • Ultra
    • Badger Airbrush
    • Paasche Airbrush
    • Sparmax Airbrushes
    • Apollo Spray Systems
  • Spares & Accessories
    • Iwata Spare Parts & Accessories
    • Harder & Steenbeck Spares & Accessories
    • Paasche Airbrush Spares and Accessories
      • Paasche Airbrush Hoses
      • Paasche Airbrush Spares
        • Paasche F
        • Paasche H/HS
      • Paasche Colour Cups and Bottles
    • Sparmax Airbrush Spares
    • Badger Airbrush Spares
    • Cleaning Supplies and Tools
    • Airbrush Stencils
  • Compressors
    • Iwata Compressor
    • Sparmax Airbrush Compressors
      • Mini Compressors
    • Badger Compressors
    • Bambi Compressors
    • Compressor Spares
  • Airbrush Kit
    • Sugarcraft Airbrush Kits
    • Fine Art Airbrush Kits
    • Automotive Airbrush Kits
    • Hobby Airbrush Kit
    • Beauty Airbrush Kits
    • Model Airbrush Kits
    • Prosthetics Airbrush Kits
    • Sign/Mural Airbrush Kits
    • Textiles Airbrush Kits
  • Spray Booths
    • Portable Work bench
    • Spray Booth Extraction
    • Spray Booth Filters & Spares
    • PPE and Room Air Filtration
    • Salon & Spray Tan Equipment
      • Nail Bar Equipment
      • Spray Tan Mist Extractors
      • Spray Tan Booths Filters
      • Spray Tanning Kits
  • Paints
    • AutoBorne
    • Createx Paint
    • Createx Bloodline by Tim Gore
    • Createx Illustration Colours
    • The Army Painter
    • Wicked Airbrush Colours
    • LifeColor Paint
    • NuWorlds Paint
    • Prosthetic Paint
  • Drawing Board
    • A0 Drawing Board
    • A1 Drawing Board
    • A2 Drawing Board
    • A3 Drawing Board
    • Drafting Tables and Machines
  • Drawing Equipment
    • Plan Chests & Planhorses
    • Lightboxes and Beam Tables
    • Cutting and Masking
      • Masking Film
  • Refurbished
Search
00 items

General Airbrush Operation & Cleaning Guide

Graphicair2023-03-21T15:48:59+00:00
Airbursh Tips

IMPORTANT: Never remove the nozzle unless it is already damaged. If you thoroughly clean the airbrush using the procedure in these instructions, it will prevent the nozzle becoming clogged so that you will not need to remove it. Although made from durable, high-quality materials, this part is small and finely engineered. Accidental damage caused by cross-threading, over-tightening, dropping the airbrush, forcing the needle or tools into the nozzle and normal wear are not covered under the warranty. Replacement parts and a repair service are available.

If a damaged nozzle needs to be replaced we advise using specialist tools for the procedure and not the basic spanner provided with the airbrush. Sparmax nozzle tools and the Iwata Nozzle Wrench are designed for this purpose and ensure you get the right angle and torque without risk of over tightening.

Safety Precautions

It is recommended that you work in a well-ventilated area and wear a particle/vapour respirator mask in accordance with the advice of the paint manufacturer. Protect your work area from overspray.

Air pressure

The ideal air pressure will depend on the viscosity (thickness) of the paint, so the best advice is to try varying your working pressure until you settle on your personal preference for each specific brand and colour. Please see your compressor instructions for setting your working pressure.

Pic 1

Paint preparation

Whatever type of paint you use, make sure it is a milky consistency. You may have to mix paint with the appropriate reducer to achieve this. Always seek instructions from the paint manufacturer on what to use as a thinner. We recommend you use products that are specifically formulated as airbrush colours.

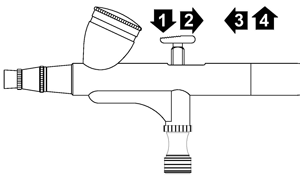
Operating your airbrush (pic 1)

These instructions are for internal mix, double action airbrushes.

Whether you are using a broad or fine spray pattern, if the paint appears wet on the surface then you are using too much paint. This may make the surface tacky and appear shiny, even when it has dried. To avoid this, build up the colour gradually in thin layers which are almost dry as they meet the surface. This also allows you to achieve an even coverage and avoids patchiness. Controlling the amount of colour to achieve broad coverage and fine lines comes with experience – so practise, practise, practise!

Note for pistol trigger airbrushes: Pulling back on the trigger starts the air. Pulling further back controls the amount of fluid being sprayed.

Pic 2

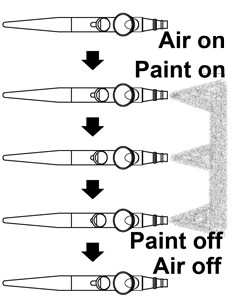
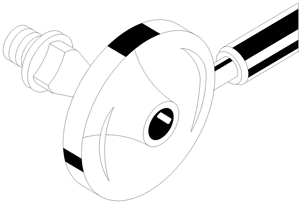
Dagger’ stroke and clean lines (pic 2)

To go from a broad line down to a fine line in one continuous stroke, move the airbrush closer to the surface of your subject and ease the trigger forward while moving the airbrush in a line or arc. This is called a ‘dagger’ stroke because the line comes to a fine point. It is the basis of all artistic freehand airbrushing.

If you see a circular blob (or ‘barbell’) at the beginning and end of the lines, it is because the airbrush was stationary when you started or stopped spraying. Once the air is on, you need to move smoothly towards where you want the line to start, then pull the button back as you come into line with your target (pic 2). Continue moving beyond the end of the line as you release the colour, then stop the air flow. It is good practice to keep the air on ready to start the next stroke if you are going to continue immediately.

Dagger strokes are also achievable with a pistol trigger airbrush using the technique above. For continuous strokes keep the air flowing by not fully releasing the trigger.

Cleaning your airbrush

Keeping your airbrush clean is essential. The vast majority of airbrush problems occur because the airbrush is simply blocked, or has seized up through lack of regular, thorough cleaning. You need to clean your airbrush between every colour change, as well as giving it an extra-thorough clean at the end of the session. For a thorough clean, first flush the airbrush with water to remove the worst of the colour. Follow with a proper airbrush cleaning fluid, then do a final flush with water. Do not allow the paint to sit in the airbrush for longer than necessary.

Pic 3

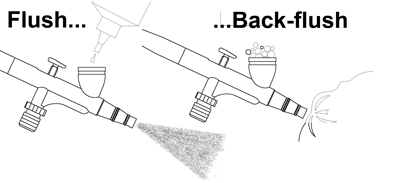
Flushing procedure (pic 3)

  1. Loosen the needle-chucking nut and pull the needle back a little.
  2. Pour the cleaning fluid into the airbrush cup.
  3. Use a short-bristled, soft brush, such as a stencil brush, to remove any paint inside the cup.
  4. Spray cleaning fluid through the airbrush away from your work and into a cleaning pot or cloth to catch the overspray.
  5. As you spray with more cleaner, cover the needle cap with a soft cloth. This forces air back through the passageways and into the bowl to dislodge any residue. You will see air bubbles in the cup. This is called the ‘backflush’ technique. Do not use a bare finger; avoid risk of forcing compressed air into your bloodstream.
  6. Repeat the flushing procedure until the cleaning fluid runs clear. Spray onto a white cloth or paper towel to test if it is completely clear. If you have been using white colour, it is better to test it against a dark surface.

For siphon/bottom feed airbrushes use the same technique as above using separate bottles for the water and cleaning fluid.

Cleaning needles and needle caps

Once you have thoroughly flushed out the airbrush, you will need to clean the needle and needle cap following the steps below.

Pic 4
  1. Remove the handle and loosen the needle-chucking nut. Dampen a soft cloth with airbrush cleaning fluid.
  2. Remove the needle carefully and draw the needle gently across the cloth whilst rotating it, then repeat. (pic 4)
  3. Unscrew the needle cap and clean the inside with a brush. Clean the nozzle cap if paint has built up on it, but do not remove the nozzle. Replace the needle cap.
  4. Ensure the button is sitting correctly before carefully re-inserting the needle. Use slight pressure to push the needle up into the nozzle until it stops. It helps to rotate the needle a little to ensure it sits properly in position.
  5. Tighten the needle-chucking nut firmly with your fingers
Pic 5

Troubleshooting

  • Regularly check the nozzle for damage under a magnifying glass. (pic 5)
  • Air is coming out of the airbrush but no paint.
    • Make sure the needle-chucking nut is tightly gripping the needle so that the trigger is drawing the needle backwards. Clean the airbrush thoroughly.
  • Air is bubbling back into the cup.
    • Make sure the needle cap and nozzle cap are finger-tight. Clean the airbrush thoroughly.
  • Paint is coming out when I press the button for air.
    • Loosen the needle-chucking nut, then reposition the needle in the nozzle, rotating it slightly to ensure it sits properly in position. Tighten the needle-chucking nut.
  • The button/air-valve is sticking.
    • Place a drop or two of non-silicone airbrush lubricant behind the trigger and press the button repeatedly to work it in. To prevent the air valve sticking again, use one drop of lubricant every few sessions.
  • Other problems.
    • If you encounter any other problems, clean your airbrush thoroughly. If the problem still occurs, call the service centre for more troubleshooting advice. Make sure you have the airbrush and compressor with you when you call. The telephone support technician will determine whether you need to send your airbrush into the service centre for diagnosis and repair.

Share this post

Facebook Twitter LinkedIn Google + Email
Get in Touch!

Latest Posts

General Airbrush Operation & Cleaning Guide
Iwata Eclipse CS – See what our Customers Think
Neo for Iwata Textile Kit
The UK Model Shop
H&S Infinity CRplus 0.2mm airbrush review

Information

  • Update Cookie Settings
  • Privacy And Cookie Policy
  • Terms & Conditions
  • Shipping
  • Returns Policy

Get in touch

Graphic Air Logo
Unit 1, Levens Hall Park,
Lund Lane, Killinghall,
Harrogate, HG3 2BG

TEL: 01423 522 836

Graphic Air
Facebook Twitter Youtube Yelp
Payment Platforms Accepted

© Copyright 2023-30. Graphicair - Get Me Branded

  • HOME
    • SHOPPING
      • My Account
      • Order Tracking
      • Cart
      • Checkout
    • INFORMATION
      • Terms & Conditions
      • Privacy And Cookies
      • Shipping
      • Returns
    • GET IN TOUCH

      Graphic Air
      Unit 1 Levens Hall Park,

      Lund Lane, Killinghall,
      Harrogate, HG3 2BG

      Phone:

      +44 (0) 1423 522 836

  • Special Offers
  • Airbrush
    • Iwata Airbrush
      • Iwata Revolution Airbrushes
      • Iwata Eclipse Airbrushes
      • Iwata High Performance Plus Airbrushes
      • Iwata Hi-Line Airbrushes
      • Iwata Custom Micron Airbrushes
      • Iwata Neo
      • Spray Guns for Industrial Use
    • Harder & Steenbeck
      • Colani
      • Infinity
      • Evolution
      • Hansa
      • Ultra
    • Badger Airbrush
    • Paasche Airbrush
    • Sparmax Airbrushes
    • Apollo Spray Systems
  • Spares & Accessories
    • Iwata Spare Parts & Accessories
    • Harder & Steenbeck Spares & Accessories
    • Paasche Airbrush Spares and Accessories
      • Paasche Airbrush Hoses
      • Paasche Airbrush Spares
        • Paasche F
        • Paasche H/HS
      • Paasche Colour Cups and Bottles
    • Sparmax Airbrush Spares
    • Badger Airbrush Spares
    • Cleaning Supplies and Tools
    • Airbrush Stencils
  • Compressors
    • Iwata Compressor
    • Sparmax Airbrush Compressors
      • Mini Compressors
    • Badger Compressors
    • Bambi Compressors
    • Compressor Spares
  • Airbrush Kit
    • Sugarcraft Airbrush Kits
    • Fine Art Airbrush Kits
    • Automotive Airbrush Kits
    • Hobby Airbrush Kit
    • Beauty Airbrush Kits
    • Model Airbrush Kits
    • Prosthetics Airbrush Kits
    • Sign/Mural Airbrush Kits
    • Textiles Airbrush Kits
  • Spray Booths
    • Portable Work bench
    • Spray Booth Extraction
    • Spray Booth Filters & Spares
    • PPE and Room Air Filtration
    • Salon & Spray Tan Equipment
      • Nail Bar Equipment
      • Spray Tan Mist Extractors
      • Spray Tan Booths Filters
      • Spray Tanning Kits
  • Paints
    • AutoBorne
    • Createx Paint
    • Createx Bloodline by Tim Gore
    • Createx Illustration Colours
    • The Army Painter
    • Wicked Airbrush Colours
    • LifeColor Paint
    • NuWorlds Paint
    • Prosthetic Paint
  • Drawing Board
    • A0 Drawing Board
    • A1 Drawing Board
    • A2 Drawing Board
    • A3 Drawing Board
    • Drafting Tables and Machines
  • Drawing Equipment
    • Plan Chests & Planhorses
    • Lightboxes and Beam Tables
    • Cutting and Masking
      • Masking Film
  • Refurbished
Manage Cookie Consent
To provide the best experiences, we use technologies like cookies to store and/or access device information. Consenting to these technologies will allow us to process data such as browsing behaviour or unique IDs on this site. Not consenting or withdrawing consent, may adversely affect certain features and functions.
Functional Always active
The technical storage or access is strictly necessary for the legitimate purpose of enabling the use of a specific service explicitly requested by the subscriber or user, or for the sole purpose of carrying out the transmission of a communication over an electronic communications network.
Preferences
The technical storage or access is necessary for the legitimate purpose of storing preferences that are not requested by the subscriber or user.
Statistics
The technical storage or access that is used exclusively for statistical purposes. The technical storage or access that is used exclusively for anonymous statistical purposes. Without a subpoena, voluntary compliance on the part of your Internet Service Provider, or additional records from a third party, information stored or retrieved for this purpose alone cannot usually be used to identify you.
Marketing
The technical storage or access is required to create user profiles to send advertising, or to track the user on a website or across several websites for similar marketing purposes.
Manage options Manage services Manage {vendor_count} vendors Read more about these purposes
View preferences
{title} {title} {title}